Publish via CI
This step demonstrates Testspace's integration with GitHub workflows for publishing test results. Testspace also works with many other popular CI systems. Refer to the Add to CI help article for details.
The example uses the GitHub repo created in Connect a Repo.
Let's use the GitHub workflow
- to manually invoke automation that will publish pre-canned test results
Run Automation
GitHub Workflows support many different types of events that will trigger a workflow, however, for this tutorial, we wanted to make things easy and interactive. For this reason, a workflow dispatch event is used versus a more common event such as push.
Using the workflow dispatch event to manually execute the GitHub Workflow
To execute the GitHub workflow go to the Actions tab. Select the CI workflow under All workflows.
- On the far right click the
Run workflowbutton, use theBranch: mainand clickRun workflow - Watch the
CIworkflow execute using the GitHub UI - When the automation is complete, switch to your Testspace project
- Explore Testspace, starting at the
Currenttab.
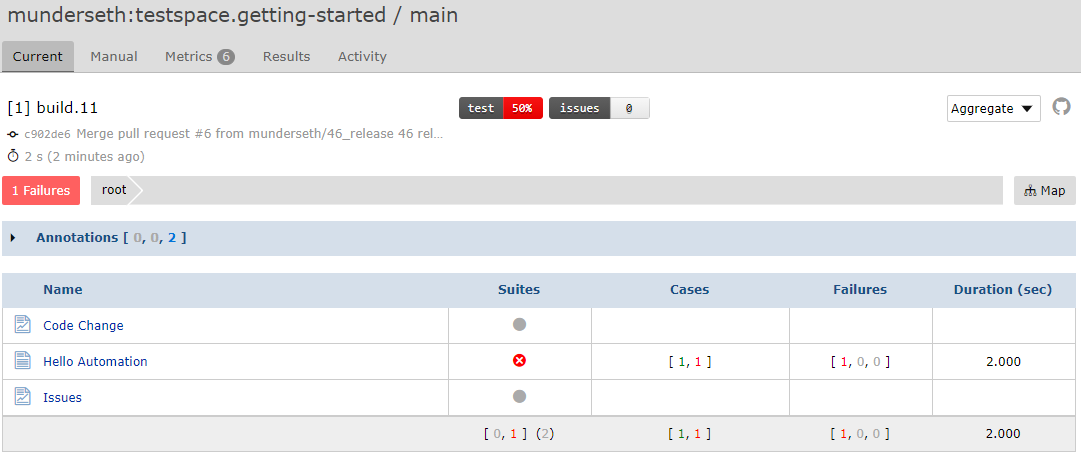
Testspace automatically tracks the branch workflow. Go ahead and create a branch and watch Testspace track it with a matching space. Pull requests are also supported, along with merged and deleted branches.
Remember to execute the automation using the GitHub UI.
Files Used
The following file content is used in this basic example for publishing automated testing results. Note that the test results are pre-canned (aka fake) and used for demonstration purposes only.
There are two files (ci.yml, results.xml) required for publishing results:
root
  └─ .github/workflows
              └─ ci.yml
  ..
  └── results.xml
  ..
Workflow File (ci.yml)
Add the following content to the .github/workflows/ci.yml file.
name: CI
on:
  workflow_dispatch:
jobs:
  build:
    runs-on: ubuntu-latest
    steps:
       - uses: actions/checkout@v3
       - uses: testspace-com/setup-testspace@v1
         with:
           domain: ${{ github.repository_owner }}
       - name: Push result to Testspace server
         run: |
           testspace results.xml
         if: always()
The domain value assumes your Testspace organization name matches your GitHub username/org — true if you installed Testspace via the GitHub Marketplace, but not if you signed up with email and picked a different organization name (as in Setup), or if you've connected more than one GitHub org (via Account → Services → GitHub) and this repo belongs to one that doesn't match. If they don't match, replace ${{ github.repository_owner }} with your actual Testspace organization name.
If using a private repo a Testspace token is required. Follow these additional steps.
- The
if: always()ensures test results are uploaded even in the event of a workflow failure. - Refer here for details on the
setup-testspaceaction.
Results File (results.xml)
For simplicity we are using pre-canned test results.
<?xml version="1.0" encoding="UTF-8"?>
<testsuites name="example" tests="2" failures="1" time="2.0">
  <testsuite name="Hello Automation">
    <testcase classname="Hello Automation" name="Test Case One" time="1.00"/>
    <testcase classname="Hello Automation" name="Test Case Two" time="1.00">
      <failure type="Exception" message="Something unexpected happened"/>
    </testcase>
  </testsuite>
</testsuites>
Pro Tips
The following tips section provides additional examples for common use-cases.
Using Folders
Results can be organized into folders.
$ testspace "[myFolder]results*.xml"
sub-folders can also be used with a forward slash /.
$ testspace "[myFolder/mySubfolder]results.xml"
Using a Matrix
When using a matrix it is recommended to use a folder to store the results specific to each matrix entry.
name: CI
on: push
jobs:
  test:
    runs-on: ${{ matrix.os }}
    strategy:
      matrix:
        os: [ubuntu-latest, macos-latest, windows-latest]
    steps:
      ..
      - name: Publish Results to Testspace
        run: testspace "[ ${{ matrix.os }} ]results.xml"
Other details
For more information on publishing features, refer to the Push Data section of the help documentation:
- Adding Code Coverage
- Organizing results based on repo source folders
- Passing wildcards, sub-directories, etc., for finding results files
- Adding custom metrics
See Tools Support for language-specific information.
Recap
This section covered the simplicity of publishing test results from automation based on GitHub workflows:
- Single line command to publish results
- Built-in branch workflow support for branching, pull requests, and forks
- Additional useful information related to the health of the build can also be included, such as code coverage, custom metrics, etc.
Setup Action
A Testspace setup action is provided:
Private Repo
If the repo being used is private there are additional steps required:
- Copy your Testspace Project push token
- Create a secret, in your repo settings named
TESTSPACE_TOKENwith value being your Testspace token. - Update the
ci.ymlfile, adding thetokeninput as shown below
- uses: testspace-com/setup-testspace@v1
  with:
    domain: ${{ github.repository_owner }}
    token:  ${{ secrets.TESTSPACE_TOKEN }}
Same domain caveat as above — replace it with your actual Testspace organization name if it doesn't match your GitHub username/org.
Domain Name
Note that the domain action parameter for setup-testspace is using a github context variable called github.repository_owner. This variable returns a string reflecting the name of the GitHub organization. When installing the Testspace app using the GitHub Marketplace the Testspace organization name matches the GitHub organization name. If the Testspace subdomain is changed the domain setup parameter needs to be updated as well.