Notes
Notes are a Project-level feature that supports sharing information and status with others on your team. The content you create here is persisted and searchable. Navigating to the Notes tab from any Space will show the Notes Summary view for the parent Project.
Note: A single Notes collection is shared by all Spaces in a Project.

- Use these tabs to switch to view either active or archived Notes.
- You can search for Notes containing the text you enter here.
- Clicking on the star icon here toggles a filter that shows either only starred Notes or all Notes.
- If a Note has a To-Do list, the number of outstanding (unchecked) To-Do items is shown here.
- If a Note has been assigned an owner, the owner's name is shown here.
- Clicking on the star icon toggles the importance of the Note between normal (no star) and important (starred).
- Note titles are displayed as clickable links, with the Note title comprising the link text.
- If a Note has one or more files attached, this icon is shown along with the count of file attachments.
- If a Note has comments attached, this icon is shown along with the count of comments.
- Clicking this icon will archive the Note, making it appear in archived Notes view.
New Note
There are two ways to create a new Note.
- Directly from the Note summary view
- Implicitly from a specific result set
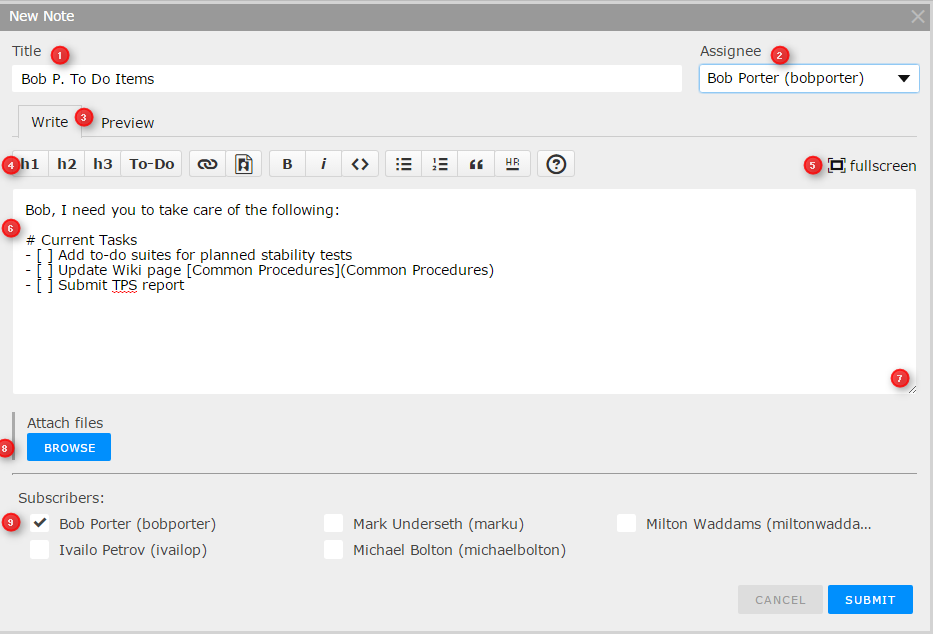
To create a Note directly click on the New Note button in the upper right of the view.

- The Note title goes here. This is the text that will comprise the link text in the Notes view.
- Here you can optionally assign a Note owner. This is useful when the Note has follow-up items (such as to-dos) and you want to make one person responsible for completion. The owner is displayed with the note in the Note view and is automatically subscribed to the Note.
- These tabs allow you to toggle between input markup text (Markdown format) and the rendered version.
- Editor toolbar. Hovering over each button will show a tooltip describing its function.
- Clicking here will display the editable note text in a full-screen mode. This is useful for Notes with lots of text.
- The note text goes here. The text is written in Markdown format with a custom extension to support to-do check boxes.
- Click and drag this thumb to resize the text box.
- Clicking here allows you to attach one or more files of any type to the note. These files will appear in the Note as clickable links.
- Users selected here will receive an email notification when the note is submitted and when any comments are added to the note in the future. The creator of the Note and the owner (if any) are automatically subscribed.
Note From Results
Often, you want to share information related to a specific result set with other members of your team. For example, there may be some test failures or other anomalies that need to be addressed.
As a convenience, you can create a Note implicitly from a result set. For more deatils see commenting on a space's result.
To-Do List
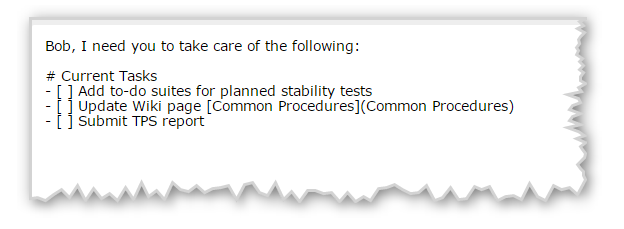
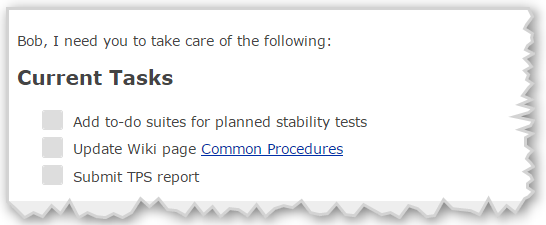
The Notes editor implements a custom extension to Markdown that's used to create ToDo check boxes.
When creating or editing a Note, you can enter the check box markdown yourself, or use the Editor Toolbar button labeled To-Do to automatically insert the text.
Shown below is the markup text and how it is rendered in the Note.
Markup

Rendered

Check State
Typically, when you create a Note with To-Do items, you create the list with all items open (unchecked). The task owner will then change the state of each item to checked once completed.
When viewing the Note, anyone can toggle the state of a To-Do check box by simply clicking on the check box.
Only the creator of the Note can edit the list.
Archive
Notes can be archived by clicking on the far right icon.
A Note can be restored to the Active tab by selecting the following icon within the Archive sub-tab.