Getting Started
When you first sign up for Testspace, you will choose an Organization name (e.g. myorg), that becomes the subdomain of your Testspace URL (e.g. myorg.testspace.com). If you don't have an account go to the Sign up section.
The following sections present the basic steps required to publish test results and execute manual tests. Each section assumes a separate Testspace project, but a single project could be used for both, as shown in the tutorial.
For more details and a specific walkthrough go to Tutorials.
Publish
A Connected project is "connected" to a Repository. There is no management of branches, they automatically discovered. A Testspace connected project will automatically work with Continuous Integration Systems (CIs). See the list of supported CIs here.
The first step is to create a Testspace
projectby clicking on the "New Project" button at the top right of the Testspace landing page.Next, update your CI yml file. The following is an example using GitHub Actions.
/.github/workflows/ci.ymlsteps:
- uses: actions/checkout@v3
- uses: testspace-com/setup-testspace@v1
with:
domain: ${{github.repository_owner}}
token: ${{ secrets.TESTSPACE_TOKEN }} # optional, only required for private repos
..
- name: Publish Results to Testspace
run: testspace "path/to/*.xml"
The project is now ready to be used for publishing test results.
Once the test automation is complete, go to your dashboard to review the results: myorg.testspace.com.
If using an in-house proprietary automation system checkout the Standalone section of the tutorial.
Example
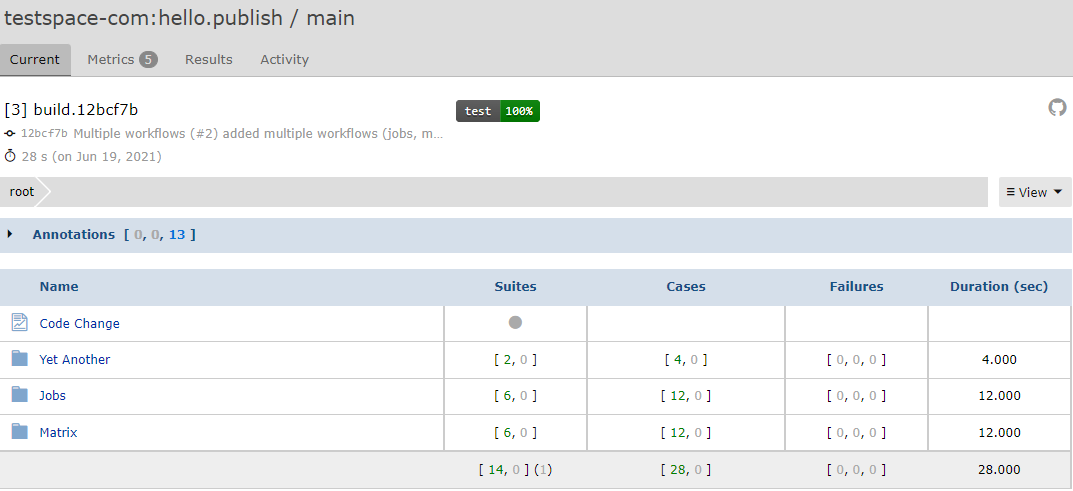
The repo - https://github.com/testspace-com/hello.publish - demonstrating support for jobs, matrix, and executing multiple workflows based on the same commit. All of the published results are aggregated together as a single result set.
Results are here.

For more details and a specific walkthrough go to Tutorials.
Manual
The Manual test framework works with GitHub repositories. Create a new repo, or use an existing repo; to implement some example manual tests.
The first step is to create a Testspace
projectby clicking on the "New Project" button at the top right of the Testspace landing page. A dialog will appear listing all of the Repositories available. Select the name of the GitHub repo that will contain the test files.Next, add test file(s) and a configuration file called
.testspace.yml, to your repo using the following directory structure. The.testspace.ymlfile requires the textmanual:. The default folder to maintain test files isspecs.root
└─ specs
└─ test1.md
└─ test2.md
└─ ..
└─ .testspace.yml
..Add some instructions to the test file(s):
/specs/test1.md---
testspace:
---
# Test 1
## Case 1
- do this
- do thatGo the
Manualtab and execute the test(s).
Example
The repo - https://github.com/testspace-com/hello.manual - provides a simple example for implementing and executing manual tests.
The test examples are here.

For more details and a specific walkthrough go to Tutorials.
Sign up
There are two types of Testspace accounts:
- Free account. Unlimited for
open-source; includes constraints for private usage. - Paid account. Requires a credit card for monthly billing "after" an initial trial period.
GitHub Marketplace
Use the GitHub Marketplace to install Testspace - https://github.com/marketplace/testspace-com
Personal
The tutorial can be used with your personal GitHub account and a corresponding Testspace organization based on your "personal" account.
Personal Testspace accounts are always free.
Organization
Testspace can also be installed on a GitHub organization using the GitHub Marketplace. A new Testspace organization will be created that matches the name of your GitHub organization.
Note you must be an
ownerof the GitHub organization to install Testspace using the GitHub Marketplace.
Invite Others
When using a GitHub Organization account and a corresponding Testspace organization, it is easy to invite other GitHub members.
- At the Testspace Organization level, select the
Userstab. - Click the
Invite Usersbutton at the upper right of the page. - A list of all GitHub organization members will be presented.
- Select the members to invite and click on "SUMIT".
For more Testspace account admin information click here.
Website
When signing up for an account using our website the following options will be presented:
For more details go here.